

Bell Ringer
Instructions: Select one of the Bell Ringers for students to reflect on and answer.
Vocabulary
Instructions: Go over important terms and their definitions before watching the Introduction to Energy Storage video. Student vocabulary list can be found in the Student Guide and Introduction to Energy Storage – Starter Pack.
| Word | Definition | Example |
|---|---|---|
| Mobility | noun; the ability of people or goods to move from one place to another | “Part of this increased mobility comes from improvements in batteries.” |
| Anode | noun; the part of a device or battery where an electric current enters; where oxidation happens and electrons are lost | “All batteries have three parts: the anode . . . the cathode . . . [and] an electrolyte.” |
| Cathode | noun; the part of a device or battery where electric current exits; where reduction happens and electrons are gained | “All batteries have three parts: the anode . . . the cathode . . . [and] an electrolyte.” |
| Electrolyte | noun; a substance that helps electric charge flow between parts of a battery | “The electrolyte is going to cause a chemical reaction in both metals.” |
| Chemical reaction | noun phrase; a process where one or more substances change into new substances with new properties | “In chemical reactions, electrons move between different substances.” |
| Electrons | noun; tiny, negatively-charged particles that move around the nucleus of an atom | “There’s a buildup of electrons on the copper side, and a loss of electrons on the zinc side.” |
| Volt | noun; a unit that measures how strong the electric force is in a circuit | “We can measure the pressure of that electron flow as almost exactly one volt.” |
| Acid | noun; a substance with special chemical properties often used in batteries or reactions | “You need two different metals, and many things make an electrolyte acid.” |
Quiz & Cloze Notes
Instructions: Review key concepts after watching the Introduction to Energy Storage video. The Student Guide and Introduction to Energy Storage – Starter Pack contain the quiz and cloze notes. Click here to play the Kahoot!
Quiz Answer Key: Q1:A Q2:C Q3:B Q4:C
Cloze Notes Answer Key: any order [anode, cathode, electrolyte]; chemical; reaction; electrons; flow; battery
Data Set
Instructions: Provide students with the Introduction to Energy Storage – Data Set for data literacy and analysis practice.
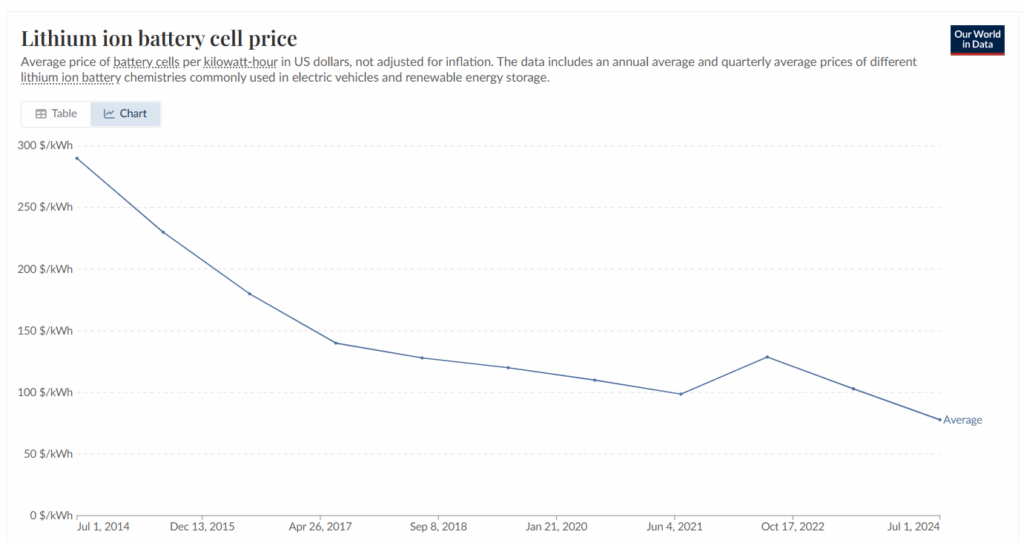
Answer Key: Question 1: The price of lithium-ion battery cells has mostly trended downward from 2014 to 2024. In 2014, the price was $290 per kWh, but by 2024, it dropped to $78 per kWh.
Question 2: Answers will vary. (Example: The price increased between 2021 and 2022. This might have happened because of problems with getting the raw materials for batteries or global events that disrupted the supply chain and caused delays or made things more expensive to produce.)
Question 3: Answers will vary. (Example: Yes, I think the price will keep going down. Technology keeps getting better and scientists are always finding new ways to make batteries that are cheaper and last longer.)
Question 4: Answers will vary. (Example: If I were a scientist, I would try to find new materials for batteries that are cheaper and more common than lithium. I would also work on recycling old batteries, so that we can reuse the same materials to make new batteries.)
Question 5: Answers will vary.
Modeling a Circuit Hands-On
Instructions: Use the Modeling a Circuit Hands-On – Student Handout and the following Teacher Guide to conduct the lab activity.
Introduction
In this hands-on activity, students will visualize how a battery works by modeling the flow of electrons through a simple circuit. Using labeled cut-outs, students will assemble and explain the function of key components – anode, cathode, electrolyte, and LED bulb – while reinforcing concepts of energy transfer and electric current.
Student Objectives
Students will be able to
- Identify and describe the roles of the anode, cathode, electrolyte, and LED bulb in a simple battery circuit.
- Model the direction of electron flow in a battery-powered circuit using labeled cut-outs and symbols.
- Explain how energy is transferred from chemical energy in a battery to electrical energy that powers a device.
- Predict and explain what happens when the components of a circuit, such as the LED bulb, are connected incorrectly.
Materials (per student group)
- Student Handout
- Modeling a Battery-Powered Circuit Student Handout
- Printed, cut out Component Cards (laminated for reuse if desired)
- Anode (Zinc)
- Cathode (Copper)
- Electrolyte
- LED bulb
- 8-10 electrons
- Arrows
- Printed Diagram Sheet
- (Optional) Tape or glue for anchoring
Procedure:
- Print and prepare one full set of Component Cards for each student group.
- Introduce the concept of batteries and how they work by watching the Introduction to Energy Storage video. Use additional visuals or a real battery if available.
- Distribute the Student Handout, Component Cards, and Diagram Sheet to each student group.
- As students follow the instructions on the Student Handout, guide the activity and give students help when needed. Encourage students to talk through their thinking as they arrange their components. Let students try to figure the diagram out for themselves instead of solving it for them.
- Once students have made their choices, have students show their diagram to another group and discuss differences, similarities or changes they want to make. Then, as a whole group, show students how to build the diagram correctly (this time, students can tape or glue their components down, if desired) and discuss the reasoning for the placement of each component.
- Students will then consolidate their understanding by completing the Reflection Questions on the Student Handout.
Key Points
- Electron Flow Direction: Electrons should be shown moving from the anode to the cathode, passing through the LED bulb in the process.
- Function of Each Component:
- Anode: Loses electrons (oxidation), starts the flow.
- Cathode: Gains electrons (reduction), completes the circuit.
- Electrolyte: Between the anode and cathode; allows internal movement of ions to maintain charge balance (not part of external electron flow).
- LED Bulb: Lights up when electrons flow through it in the correct direction.
- Why the LED light works in one direction only: LEDs are diodes. They only allow current to flow one way. If placed backwards, the bulb won’t light up.
Answer Key
The Student Guide contains the Modeling a Circuit – Student questions.
Reflection Questions Answer Key:
Question 1: At the anode, electrons are lost in a process called oxidation. This is important because it gets the electrons moving to begin the flow into the wire.
Question 2: At the cathode, electrons are gained in a process called reduction. This is important because if the electrons had nowhere to go, the circuit would not be complete, and electricity could not flow.
Question 3: The electrolyte helps move the ions inside the battery and keep the chemical reaction going, so that the electrons keep flowing.
Question 4: The battery stores chemical energy. When the electrons move, it turns into electrical energy. When the electrons go through the LED, that energy turns into light energy that we can see.
Question 5: LED bulbs only let electricity flow in one direction. The positive side needs to be connected to the wire leading to the cathode, and the negative side needs to be connected to the wire from the anode. If the LED is placed backward, it will not light up, because the electrons could not flow through.
Question 6: Answers will vary.
Diagram Activity Answer Key
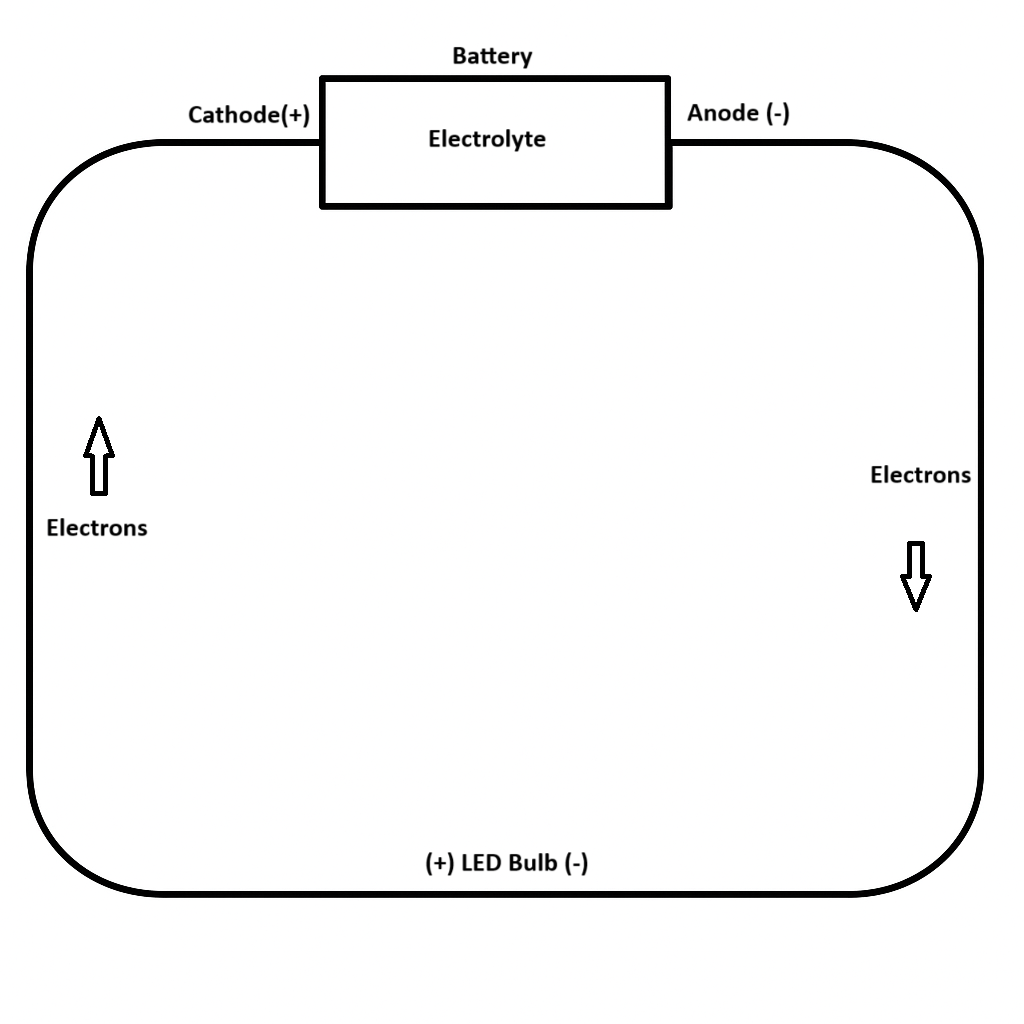
Component Cards
Anode (-) | Cathode (+) |
(+) LED Bulb (-) | Electrolyte (Acid) |
Electrons ⚫⚫⚫ | Electrons ⚫⚫⚫ |
➞ | ➞ |
Optional Extension: Energy Transformation Cards
Instructions
To reinforce the concept of where and how energy changes in the system, have students place the energy cards next to the correct components.
Chemical energy ➞ Battery
Electrical energy ➞ Wires
Light energy ➞ LED bulb
Chemical Energy | Electrical Energy |
Light Energy | Electrical Energy |
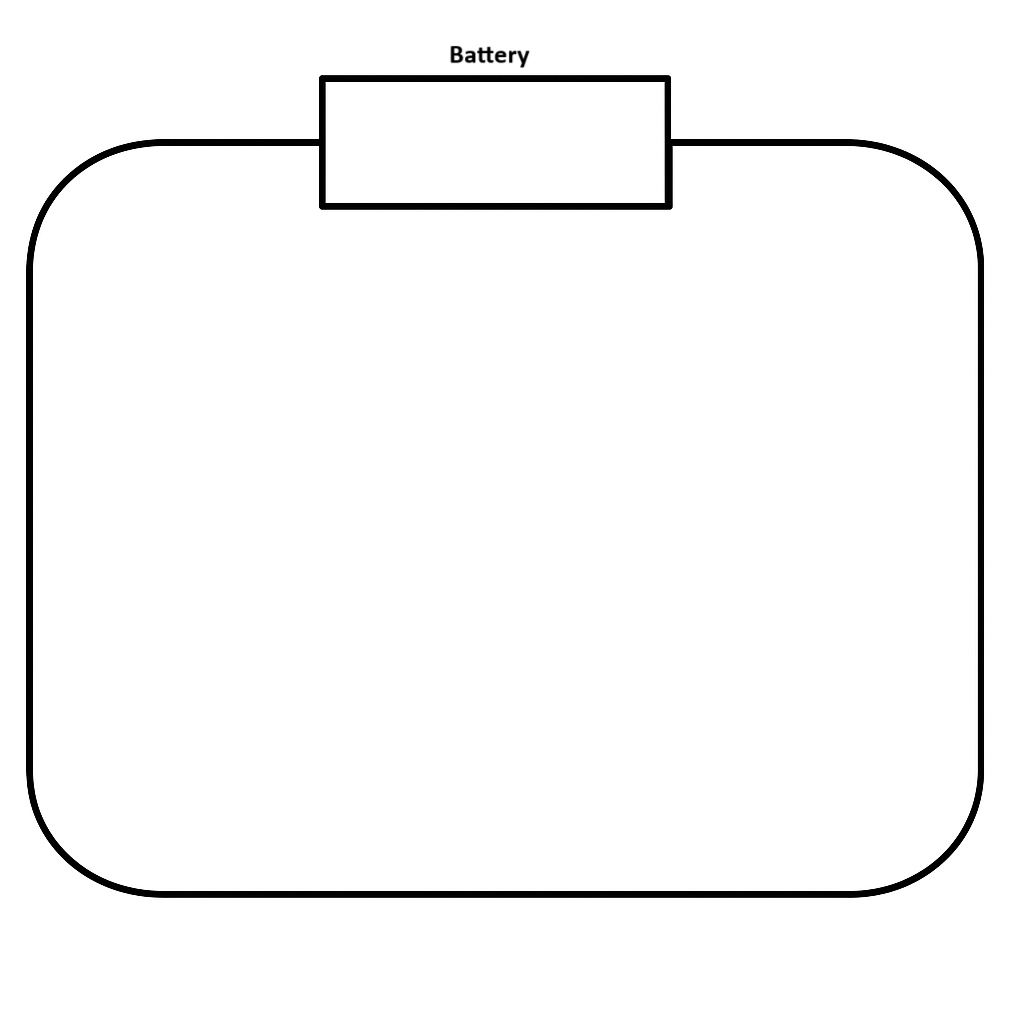
Diagram Sheet
Exit Ticket
Instructions: Access the Exit Ticket and have students reflect on and answer the prompt.